
This small-batch sourdough delivers a crisp, golden crust and a tangy, open crumb in mini loaves that are perfect for weeknight dinners or a gift from your kitchen. The dough is simple — just starter, flour, water, and salt — and the slow rise builds flavor and chew. If you enjoy rustic sourdough breads, you might also like a savory twist like homemade sourdough runzas for a different way to use your starter.
Recipe Information
- Prep Time: 4–6 hours (mostly inactive rise; about 20 minutes active)
- Cook Time: 20–25 minutes
- Total Time: 4 hr 20 min–6 hr 25 min
- Servings: 6 mini loaves
- Difficulty Level: Medium
Nutrition Information
- Calories per serving: 180 kcal (approximate)
- Protein: 4.5 g
- Carbohydrates: 32 g
- Fat: 1 g
- Fiber: 1.5 g
- Sugar: 0.5 g
- Sodium: 760 mg
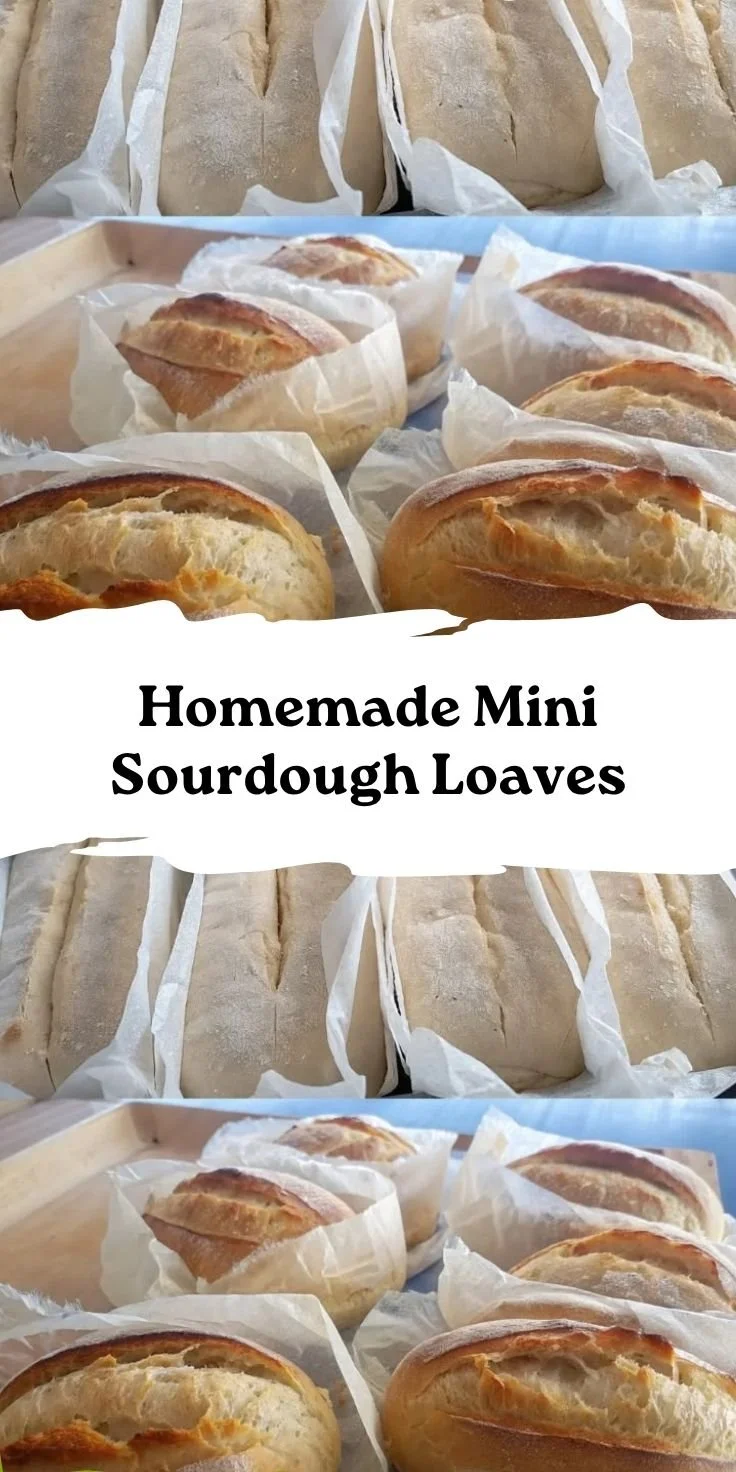
Why Make This Homemade Mini Sourdough Loaves
Mini sourdough loaves are quick to shape, bake fast, and give you that classic sourdough tang in smaller portions. They brown beautifully, smell nutty and warm while baking, and have a chewy crumb with a crisp crust. Make them when you want fresh bread without committing to a large boule. They are great for sandwiches, alongside soup, or for sharing at a gathering.
How to Make Homemade Mini Sourdough Loaves
This recipe uses simple ingredients and basic techniques. You mix a wet starter with water and salt, bring in the flour, knead until smooth, and allow a long, slow rise to develop flavor. After shaping, a hot oven gives a strong oven spring and a caramelized crust. Follow the step headings below for clear guidance.
Ingredients:
- 1 cup sourdough starter
- 2 cups all-purpose flour
- 1 cup water
- 2 teaspoons salt
Directions:
Step 1: Preparation
In a large bowl, mix the sourdough starter, water, and salt until well combined. Use a spoon or your hand to stir until the liquid looks uniform and slightly bubbly from the starter.
Step 2: Mixing
Gradually add the flour, mixing until a shaggy dough begins to form. Take your time and add the flour in parts so the dough hydrates evenly.
Step 3: Kneading
Knead the dough on a floured surface for about 10 minutes until smooth and elastic. The dough should feel slightly tacky but not sticky. If it tears easily, knead a little longer.
Step 4: First Rise
Place the dough in a lightly greased bowl, cover it with a damp towel or plastic wrap, and let it rise at room temperature for 4–6 hours, or until it has doubled in size. The long rise builds flavor and creates that open crumb.
Step 5: Preheat Oven
Preheat the oven to 450°F (230°C). Position a rack in the center and, if you have one, place a baking stone or heavy sheet to heat. A hot surface helps with oven spring.
Step 6: Divide and Shape
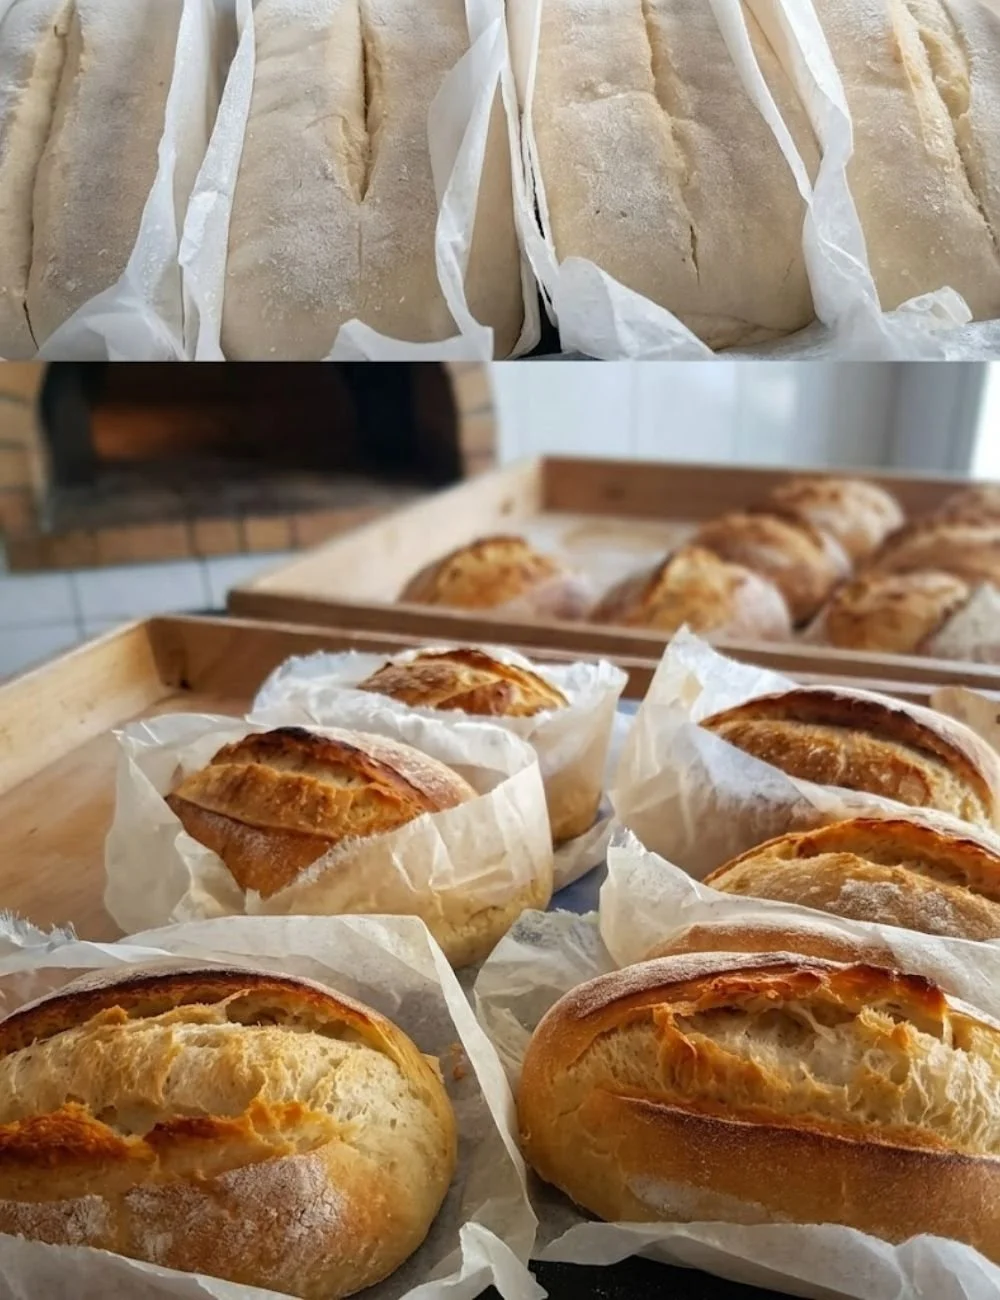
Divide the dough into small portions (about 6 equal pieces) and shape them into mini loaves by folding and rolling to create surface tension. Tuck seams underneath for a neat appearance.
Step 7: Prepare Baking Sheet
Place the loaves on a baking sheet lined with parchment paper, leaving space between each loaf for expansion. Lightly dust the tops with flour if you like a rustic look.
Step 8: Score the Loaves
Score the tops of the loaves with a sharp knife or lame. Make a shallow slash to control how the loaf opens and to create an attractive pattern.
Step 9: Baking
Bake for 20–25 minutes until golden brown and the loaves sound hollow when tapped on the bottom. If you want extra crust, bake a couple of minutes longer while watching closely.
Step 10: Cooling
Allow the loaves to cool on a wire rack for at least 30 minutes before slicing. Cooling finishes the crumb and prevents a gummy interior.
How to Serve Homemade Mini Sourdough Loaves
Serve warm with butter, olive oil and herbs, or use as sandwich buns. Their tang pairs well with sharp cheeses and cured meats. For breakfast, toast slices and top with avocado or jam. For dinner, slice halves and serve alongside a hearty stew or soup so guests can dunk the bread and enjoy the chewy bite.
How to Store Homemade Mini Sourdough Loaves
- Short term: Keep at room temperature in a paper bag or wrapped in a clean kitchen towel for 1–2 days to preserve crust.
- Medium term: Store in a breathable container or bread box up to 3 days to prevent the crumb from drying.
- Long term: Freeze whole or sliced loaves in airtight bags for up to 3 months. Thaw at room temperature or toast slices straight from the freezer.
- Re-crisp: Warm in a 350°F (175°C) oven for 5–10 minutes to refresh crust and texture.
Expert Tips for Perfect Homemade Mini Sourdough Loaves
- Use an active starter: Feed your starter 4–8 hours before baking so it’s bubbly and strong.
- Measure by weight: For consistent results, weigh flour and starter when possible.
- Hydration: If dough feels too dry, add a tablespoon of water at a time. If too wet, dust a bit more flour.
- Temperature matters: A warm kitchen speeds fermentation; a cool kitchen will slow it. Adjust rise time accordingly.
- Steam for crust: Add steam in the first 10 minutes of baking by placing a small pan of hot water in the oven or spritzing water at the loaf.
- Don’t rush cooling: Cutting too soon can leave the crumb gummy. Wait at least 30 minutes.
Delicious Variations
- Garlic-herb: Fold minced garlic and chopped rosemary into the dough for aromatic mini loaves.
- Olive and thyme: Add chopped olives and fresh thyme for a savory Mediterranean twist.
- Seeded tops: Brush loaves with water and sprinkle sesame or poppy seeds before baking.
- Whole wheat mix: Substitute half the flour with whole wheat flour for nuttier flavor (expect denser crumb).
- Cheddar-stuffed: Flatten portions, add a cube of cheddar, and wrap the dough around it for melty centers.
Frequently Asked Questions
Q: Can I use a refrigerated starter?
A: Yes. If your starter lives in the fridge, feed it and let it become active and bubbly before using. A cold starter will slow fermentation and may need a longer rise.
Q: How do I know when the dough has doubled in size?
A: Look for the dough to look puffed, airy, and about twice as large as when you placed it in the bowl. A gentle poke should slowly fill back in.
Q: What if my dough is sticky and hard to handle?
A: Dust your hands and work surface lightly with flour and use a bench scraper to lift and fold the dough. Slight tackiness is normal for hydrated dough.
Q: Can I shorten the rise time?
A: You can, by using warmer temperatures or more active starter, but flavor and texture may be less developed. Shorter rise yields a milder tang and denser crumb.
Q: Why did my loaves come out flat?
A: Flat loaves can result from over-proofing, under-kneading, weak starter, or a soggy shaping technique. Try a slightly shorter rise and firmer shaping next time.
Q: Can I make these ahead for an event?
A: Yes. Bake ahead and freeze the loaves. Thaw and warm in the oven before serving. For best crust, reheat at 350°F (175°C) for 8–10 minutes.
Q: Is salt necessary in the recipe?
A: Yes. Salt balances the sour flavor, strengthens gluten, and improves crust color. You can slightly reduce it to taste but not omit it.
Conclusion
These mini sourdough loaves are an easy way to enjoy fresh, tangy bread without a large commitment. They brown to a crisp exterior, smell amazing while baking, and deliver a chewy, flavorful crumb. Try the basic recipe first, then experiment with herbs, cheeses, or seeds. Baking them teaches you the rhythms of sourdough and rewards you with warm loaves to share. Give them a try—you’ll love the simple pleasure of homemade bread.
Print
Homemade Mini Sourdough Loaves
- Total Time: 265 minutes
- Yield: 6 mini loaves 1x
- Diet: Vegetarian
Description
Delicious mini sourdough loaves with a crisp, golden crust and tangy, chewy crumb, perfect for weeknight dinners or sharing.
Ingredients
- 1 cup sourdough starter
- 2 cups all-purpose flour
- 1 cup water
- 2 teaspoons salt
Instructions
- In a large bowl, mix the sourdough starter, water, and salt until well combined.
- Gradually add the flour, mixing until a shaggy dough begins to form.
- Knead the dough on a floured surface for about 10 minutes until smooth and elastic.
- Place the dough in a lightly greased bowl, cover it, and let it rise for 4–6 hours.
- Preheat the oven to 450°F (230°C) with a baking stone inside if available.
- Divide the dough into small portions (6 equal pieces) and shape them into mini loaves.
- Place the loaves on a baking sheet lined with parchment paper.
- Score the tops of the loaves with a sharp knife.
- Bake for 20–25 minutes until golden brown and hollow sounding.
- Allow the loaves to cool on a wire rack for at least 30 minutes before slicing.
Notes
For a better crust, add steam in the first 10 minutes of baking by placing a pan of water in the oven.
- Prep Time: 240 minutes
- Cook Time: 25 minutes
- Category: Bread
- Method: Baking
- Cuisine: American
Nutrition
- Serving Size: 1 loaf
- Calories: 180
- Sugar: 0.5g
- Sodium: 760mg
- Fat: 1g
- Saturated Fat: 0g
- Unsaturated Fat: 0g
- Trans Fat: 0g
- Carbohydrates: 32g
- Fiber: 1.5g
- Protein: 4.5g
- Cholesterol: 0mg