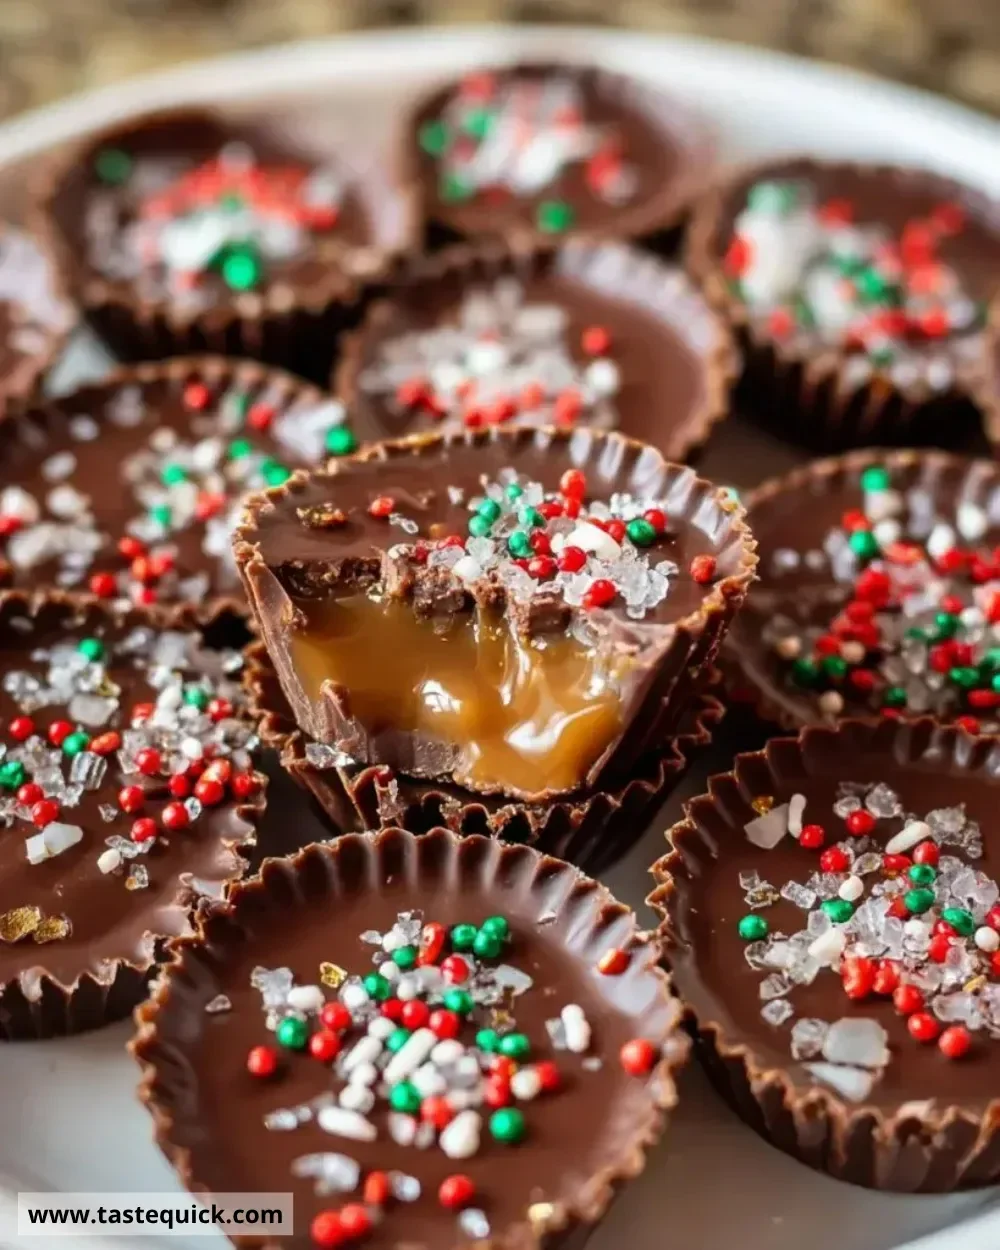
Christmas is a time of sweet treats and memorable gatherings, and nothing embodies this spirit quite like Christmas Chocolate Caramel Cups. These delightful little morsels combine rich chocolate, creamy caramel, and a touch of sea salt, creating a comforting holiday indulgence that’s sure to impress family and friends.
Recipe Information
- Prep Time: 20 minutes
- Cook Time: 20 minutes
- Total Time: 40 minutes
- Servings: 12 cups
- Difficulty Level: Easy
Nutrition Information
- Calories per serving: 150
- Protein: 1g
- Carbohydrates: 22g
- Fat: 7g
- Fiber: 0g
- Sugar: 16g
- Sodium: 30mg
Why Make This Christmas Chocolate Caramel Cups
Christmas Chocolate Caramel Cups are a must-have holiday treat. Not only do they taste incredible, but they are also visually appealing. The layered combination of chocolate and caramel, topped with a hint of sea salt, creates a perfect balance of flavors. These cups are quick to prepare, making them ideal for last-minute holiday gatherings. Plus, they make a fantastic gift when placed in a festive box!
How to Make Christmas Chocolate Caramel Cups
Creating these chocolate caramel delights is both simple and fun. With just a few steps, you can enjoy homemade treats that taste as good as they look.
Ingredients:
- 1 cup chocolate chips
- 1 cup caramels
- 2 tablespoons heavy cream
- Sea salt (for topping)
- Mini cupcake liners
Directions:
-
Step 1: Melting Chocolate
Melt chocolate chips in a microwave-safe bowl, stirring every 30 seconds until smooth. This careful melting ensures a silky texture for your chocolate base.
-
Step 2: Preparing the Liners
Line a mini muffin tin with cupcake liners. This step makes it easy to remove the finished cups and adds to the festive presentation.
-
Step 3: Assembling the Chocolate Layer
Spoon melted chocolate into the liners, covering the bottom and slightly up the sides. Aim for an even layer to create a sturdy shell for your caramel.
-
Step 4: Setting the Chocolate
Refrigerate for about 10 minutes until set. This will provide a solid foundation for the caramel layer.
-
Step 5: Making the Caramel Filling
In a saucepan, melt caramels with heavy cream over low heat until smooth. Stir constantly to prevent burning and ensure a creamy consistency.
-
Step 6: Pouring the Caramel
Pour caramel over the chocolate layer in each cup. Use a spoon to distribute it evenly, filling each cup just below the top edge.
-
Step 7: Setting the Caramel
Refrigerate for another 10 minutes until the caramel is set. This step is crucial for preventing a mess when adding the top layer of chocolate.
-
Step 8: Adding the Final Chocolate Layer
Top with remaining melted chocolate, and sprinkle sea salt on top. The salt enhances the sweetness and adds a gourmet touch.
-
Step 9: Final Cooling
Let them cool completely in the fridge before serving. This final chilling step ensures your cups are perfectly structured.
How to Serve Christmas Chocolate Caramel Cups
These delightful cups are perfect for holiday parties, serving as a sweet finish to festive meals or as a coffee break treat. They can be plated on a decorative tray or placed in individual treat bags for easy sharing. Pair them with a warm cup of cocoa or a festive holiday drink to enhance the experience.
How to Store Christmas Chocolate Caramel Cups
Store any leftovers in an airtight container in the refrigerator for up to one week. If you want to enjoy them later, they can be frozen for up to three months. Just ensure to separate layers with parchment paper to prevent sticking.
Expert Tips for Perfect Christmas Chocolate Caramel Cups
- Use quality chocolate: Better chocolate will yield a smoother melt and richer flavor.
- Adjust salt to taste: If you’re not a fan of a strong salty flavor, use less sea salt or skip it entirely.
- Experiment with toppings: Try adding crushed candy canes or chopped nuts for an extra holiday twist.
- Be patient while melting: Stirring frequently prevents scorching and helps achieve the perfect consistency.
- Allow ample cooling time: This assures a better texture in each piece.
Delicious Variations
- Nutty Layer: Add a layer of finely chopped nuts either in between the chocolate and caramel layers or on top after the final chocolate layer.
- Peppermint Twist: Incorporate crushed peppermint candies into the chocolate mixture for a festive flair.
- Spiced Caramel: Add a pinch of cinnamon or nutmeg to the caramel for a warm, spiced flavor.
Frequently Asked Questions
-
Can I use dark chocolate instead of milk chocolate? Yes! Dark chocolate will give a richer flavor and a slightly different texture, but it works beautifully.
-
What if I can’t find mini cupcake liners? If you can’t find mini liners, you can use a regular muffin tin, but be sure to adjust the amount of chocolate and caramel to fit.
-
Can I make these in advance? Absolutely! You can make them a few days ahead of time. Just store them properly in the fridge as mentioned above.
-
What kind of sea salt works best? Flaky sea salt, like Maldon or fleur de sel, works wonderfully for topping, as it adds a nice crunch and burst of flavor.
-
How do I prevent the chocolate from getting too hard? Ensure you don’t overheat the chocolate during melting. Heating it too long can lead to a stiff final product.
Conclusion
Christmas Chocolate Caramel Cups are not just a treat; they evoke the warmth and joy of the holiday season. By following this simple recipe, you can create a batch of delicious cups that are sure to please anyone who bites into them. Their rich flavors and delightful textures will make them a staple at your holiday gatherings. So gather your ingredients and bring a little sweetness to your festive celebrations! Happy baking!
Print
Christmas Chocolate Caramel Cups
- Total Time: 40 minutes
- Yield: 12 cups 1x
- Diet: Vegetarian
Description
Delightful little morsels combining rich chocolate, creamy caramel, and a touch of sea salt, perfect for the holiday season.
Ingredients
- 1 cup chocolate chips
- 1 cup caramels
- 2 tablespoons heavy cream
- Sea salt (for topping)
- Mini cupcake liners
Instructions
- Melt chocolate chips in a microwave-safe bowl, stirring every 30 seconds until smooth.
- Line a mini muffin tin with cupcake liners.
- Spoon melted chocolate into the liners, covering the bottom and slightly up the sides.
- Refrigerate for about 10 minutes until set.
- In a saucepan, melt caramels with heavy cream over low heat until smooth.
- Pour caramel over the chocolate layer in each cup.
- Refrigerate for another 10 minutes until the caramel is set.
- Top with remaining melted chocolate and sprinkle sea salt on top.
- Let them cool completely in the fridge before serving.
Notes
Store leftovers in an airtight container in the refrigerator for up to one week or freeze for up to three months.
- Prep Time: 20 minutes
- Cook Time: 20 minutes
- Category: Dessert
- Method: Making
- Cuisine: American
Nutrition
- Serving Size: 1 cup
- Calories: 150
- Sugar: 16g
- Sodium: 30mg
- Fat: 7g
- Saturated Fat: 4g
- Unsaturated Fat: 3g
- Trans Fat: 0g
- Carbohydrates: 22g
- Fiber: 0g
- Protein: 1g
- Cholesterol: 0mg