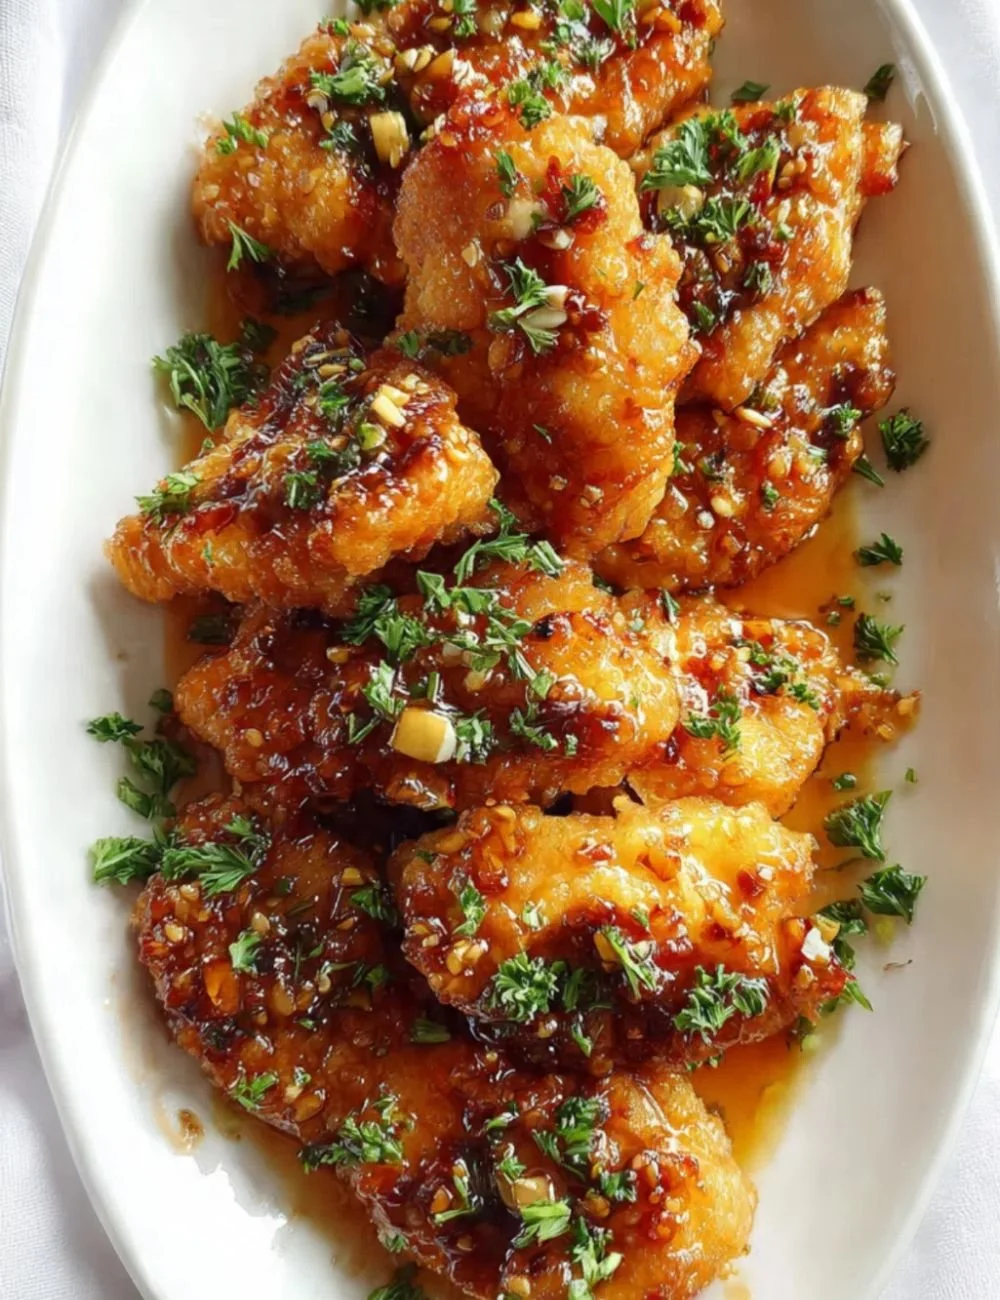
This Crispy Honey Garlic Chicken is a fast, flavorful weeknight winner: crunchy bites of chicken coated in a glossy, sweet-savory sauce with a warm garlic aroma. The outside is crisp, the inside stays juicy, and the sauce clings to every piece so you get sticky, caramelized goodness in every bite. For a hands-off, slow-cooker version if you want to try a different method, see an easy slow-cooker honey garlic chicken for inspiration.
Recipe Information
- Prep Time: 10 minutes
- Cook Time: 15 minutes
- Total Time: 25 minutes
- Servings: 4
- Difficulty Level: Easy
Nutrition Information
(approximate per serving)
- Calories per serving: 380 kcal
- Protein: 35 g
- Carbohydrates: 33 g
- Fat: 11 g
- Fiber: 0–1 g
- Sugar: 17 g
- Sodium: 1,190 mg
Why Make This Crispy Honey Garlic Chicken
This recipe gives you crisp, golden chicken with a glossy honey-garlic sauce in under 30 minutes. It’s a great mix of textures—crunchy exterior, tender interior—and tastes: sweet honey, salty soy, and bright garlic. It’s perfect for busy weeknights, casual dinners, or when you want a crowd-pleasing dish with minimal fuss. The ingredients are pantry-friendly and the method is forgiving, so even beginners get great results.
How to Make Crispy Honey Garlic Chicken
Make sure your chicken pieces are similar in size so they cook evenly. Coat them in cornstarch for a light, crisp crust, and keep the pan hot so the chicken browns quickly instead of stewing. When you add the sauce, let it simmer briefly so it thickens and glazes the chicken. The final dish should smell of warm garlic and caramelized honey, look glossy with a golden crust, and taste balanced between sweet and savory.
Ingredients:
- 1 lb chicken thighs or breasts, cut into bite-sized pieces
- 1/2 cup cornstarch
- 1/2 teaspoon salt
- 1/2 teaspoon black pepper
- 1/4 cup honey
- 1/4 cup soy sauce
- 3 cloves garlic, minced
- 2 tablespoons vegetable oil
- 1 tablespoon rice vinegar (optional)
- Sesame seeds (for garnish)
- Chopped green onions (for garnish)
Directions:
Step 1: Preparation
In a large bowl, mix the cornstarch, salt, and black pepper. Add the bite-sized chicken pieces and toss until each piece is fully coated with the dry mixture. Pat pieces lightly if needed so excess cornstarch falls off.
Step 2: Searing the Chicken
Heat 2 tablespoons vegetable oil in a large skillet over medium-high heat until shimmering. Add the coated chicken pieces in a single layer (work in batches if needed). Cook without moving for a minute, then turn pieces so they brown evenly. Cook until crispy and golden brown on all sides, about 5–7 minutes total. Remove the chicken from the skillet and set aside on a plate.
Step 3: Making the Honey Garlic Sauce
In the same skillet, lower heat to medium and add the honey, soy sauce, minced garlic, and rice vinegar if using. Stir constantly to combine and let the sauce come to a gentle simmer. Cook 2–3 minutes until the sauce thins slightly and the garlic softens—this concentrates flavor and warms the honey for a glossy glaze.
Step 4: Finishing and Glazing
Return the crispy chicken to the skillet and toss quickly to coat every piece in the honey garlic sauce. Cook another minute so the sauce clings and slightly thickens into a glaze. Transfer to a serving dish and garnish with sesame seeds and chopped green onions.
How to Serve Crispy Honey Garlic Chicken
Serve over steamed white rice, brown rice, or fried rice for a complete meal. It also pairs well with stir-fried vegetables, steamed broccoli, or a simple side salad to brighten the plate. For party trays, place skewers of the finished chicken on a platter with extra sesame seeds and green onions on top. The sticky glaze looks attractive and makes it easy to eat with chopsticks or forks.
How to Store Crispy Honey Garlic Chicken
- Refrigerator: Cool to room temperature, then store in an airtight container for up to 3 days. Reheat in a skillet over medium heat to keep the crust crisp, adding a splash of water if sauce tightens.
- Freezer: Freeze in a sealed container for up to 1 month. Thaw overnight in the fridge before reheating. Reheat gently in a skillet or oven at 350°F (175°C) until warmed through. Avoid microwaving if you want to preserve crispness.
Expert Tips for Perfect Crispy Honey Garlic Chicken
- Dry chicken well before coating; moisture prevents crisping.
- Don’t overcrowd the pan—crowding steams the chicken. Cook in batches if needed.
- Keep oil hot but not smoking to get that quick sear.
- If sauce is too thin, simmer a little longer; if it gets too thick, add a splash of water.
- Taste the sauce before tossing: a squeeze of rice vinegar or a pinch of chili flakes can balance sweetness.
- Use thighs for juicier results and breasts for leaner bites. Adjust cook time slightly if pieces are larger.
Delicious Variations
- Spicy Honey Garlic: Add 1 teaspoon chili paste or 1/2 teaspoon red pepper flakes to the sauce.
- Baked Version: Coat chicken, place on a greased baking sheet, and bake at 425°F (220°C) for 18–22 minutes, flipping halfway, then toss with sauce.
- Gluten-Free: Use tamari or coconut aminos instead of soy sauce. Cornstarch is already gluten-free—confirm labels if needed.
- Sesame-Ginger Twist: Add 1 teaspoon grated fresh ginger and 1 teaspoon toasted sesame oil to the sauce.
- Honey Garlic Tofu: Substitute firm tofu cubes for chicken and pan-fry until crisp; proceed with the sauce.
Frequently Asked Questions
Q: Can I use frozen chicken?
A: Thaw fully in the refrigerator before cutting and coating. Pat dry to remove extra moisture so the cornstarch can crisp.
Q: How do I prevent the sauce from burning?
A: Keep heat at medium when simmering the sauce and stir constantly. If it thickens too fast, lower the heat and add a splash of water.
Q: Is cornstarch necessary?
A: Cornstarch creates a light, crispy crust. You can use potato starch or rice flour as substitutes. All-purpose flour will work but gives a different texture.
Q: Can I make the sauce ahead of time?
A: Yes, make the sauce and refrigerate up to 2 days. Warm gently before combining with the chicken. Freshly cooked chicken yields the best texture.
Q: Why is my chicken soggy after adding the sauce?
A: Soggy results happen if the chicken wasn’t crisped enough, the pan was too crowded, or the sauce was added while very thin. Make sure chicken is well-browned and toss briefly in a slightly thickened sauce so the crust stays.
Q: How can I lower the sodium?
A: Use low-sodium soy sauce or reduce the amount by half and add a touch of extra honey or a squeeze of citrus to balance flavor.
Conclusion
This Crispy Honey Garlic Chicken is quick, comforting, and reliably tasty—crispy texture, warm garlic aroma, and a glossy sweet-savory sauce. It’s easy to adapt for dietary needs and serves well for family dinners or casual entertaining. For another tested take on honey garlic chicken that uses a slow-cooker for hands-off convenience, check out Butter Be Ready’s Crispy Honey Garlic Chicken. Give it a try—once you get that perfect crispy sear and sticky glaze, it’ll become a go-to recipe.
Print
Crispy Honey Garlic Chicken
- Total Time: 25 minutes
- Yield: 4 servings 1x
- Diet: Non-Vegetarian
Description
A fast and flavorful weeknight winner, this crispy honey garlic chicken features crunchy bites coated in a glossy, sweet-savory sauce with a warm garlic aroma.
Ingredients
- 1 lb chicken thighs or breasts, cut into bite-sized pieces
- 1/2 cup cornstarch
- 1/2 teaspoon salt
- 1/2 teaspoon black pepper
- 1/4 cup honey
- 1/4 cup soy sauce
- 3 cloves garlic, minced
- 2 tablespoons vegetable oil
- 1 tablespoon rice vinegar (optional)
- Sesame seeds (for garnish)
- Chopped green onions (for garnish)
Instructions
- In a large bowl, mix the cornstarch, salt, and black pepper. Add chicken pieces and toss until fully coated.
- Heat vegetable oil in a large skillet over medium-high heat. Add the chicken in a single layer and cook until crispy and golden brown, about 5–7 minutes. Remove from skillet.
- In the same skillet, lower the heat and add honey, soy sauce, minced garlic, and rice vinegar. Stir to combine and let simmer for 2–3 minutes.
- Return the chicken to the skillet and toss to coat in the sauce. Cook for another minute until the sauce thickens slightly. Garnish with sesame seeds and green onions before serving.
Notes
Serve over rice or with vegetables for a complete meal. Store leftovers in an airtight container for up to 3 days.
- Prep Time: 10 minutes
- Cook Time: 15 minutes
- Category: Main Course
- Method: Searing
- Cuisine: Asian
Nutrition
- Serving Size: 1 serving
- Calories: 380
- Sugar: 17g
- Sodium: 1190mg
- Fat: 11g
- Saturated Fat: 2g
- Unsaturated Fat: 7g
- Trans Fat: 0g
- Carbohydrates: 33g
- Fiber: 1g
- Protein: 35g
- Cholesterol: 85mg