
Making butter at home is simple, fast, and oddly satisfying. You only need heavy cream and a little elbow grease (or a mixer). The result is creamy, rich butter with a fresh, slightly sweet dairy aroma and a silky texture that spreads easily. If you enjoy finishing dishes with a fresh pat of butter—think warm bread or pasta—you might also like recipes that pair butter with pasta like buttery steak tortellini for a decadent meal.
Recipe Information
- Prep Time: 5 minutes
- Cook Time: 10 minutes (mixing/churning)
- Total Time: 15 minutes
- Servings: 8 (about 1 tablespoon each)
- Difficulty Level: Easy
Nutrition Information
Approximate nutrition per serving (1 tablespoon unsalted homemade butter):
- Calories per serving: 102 kcal
- Protein: 0.1 g
- Carbohydrates: 0 g
- Fat: 11.5 g
- Fiber: 0 g
- Sugar: 0 g
- Sodium: 1 mg (unsalted; increases if you add salt)
Why Make This Homemade Butter
Homemade butter tastes fresher and more vibrant than store-bought tubs. It has a clean, creamy flavor with a buttery sweetness and a smooth mouthfeel. You control the salt and texture. Making your own also yields fresh buttermilk as a byproduct—great for pancakes, biscuits, or quick breads. The process is fun, hands-on, and takes only a few minutes.
How to Make Homemade Butter
You only need cold or room-temperature heavy cream and a mixer or a jar. The cream will first whip into soft and stiff peaks, then collapse and separate into pale yellow butter and thin liquid buttermilk. Rinse the butter to remove leftover buttermilk so it stores longer. Add salt if you like a savory finish.
Ingredients:
- Heavy cream
- Salt (optional)
Directions:
Step 1: Preparation
Pour the heavy cream into a mixing bowl. Use chilled heavy cream for best separation. If you prefer salted butter, measure a pinch of salt now to add later. Have a fine-mesh strainer or jar ready to catch the buttermilk.
Step 2: Mixing
Using a hand mixer or stand mixer, whip the cream on medium speed until it thickens and forms whipped cream peaks. This takes a few minutes. Keep the mixer steady and watch the texture change from smooth to airy.
Step 3: Cooking
Continue mixing until the cream separates into butter and buttermilk, about 8–10 minutes total from the start of whipping. You’ll hear a change in sound and see clumps of yellow butter form and a thin, translucent liquid (buttermilk) appear. Stop the mixer once you see solid butter and clear liquid.
Step 4: Finishing
Once the butter forms, pour off the buttermilk into a container—you can save it for baking or pancakes. Rinse the butter under cold running water or knead it in cold water to remove any remaining buttermilk; repeat until the water runs clear. If desired, add salt to taste and mix well. Shape the butter into a log or press into a container. Store in the refrigerator.
How to Serve Homemade Butter
Serve fresh butter at room temperature for maximum spreadability. Try it slathered on warm bread, melted over steamed vegetables, tossed with pasta, or used to baste fish. Its rich, creamy flavor brightens simple dishes and adds a silky mouthfeel to sauces.
How to Store Homemade Butter
Wrap shaped butter tightly in parchment, plastic wrap, or keep in an airtight container. Refrigerate for up to 2 weeks. For longer storage, freeze butter for up to 3 months; thaw in the fridge before use. Label containers with the date and whether salt was added.
Expert Tips for Perfect Homemade Butter
- Use high-fat heavy cream (35–40% fat) for best yield and texture.
- Cold cream is easier to handle, but slightly warm cream whips faster. Adjust based on your mixer.
- Rinse thoroughly to remove buttermilk; leftover buttermilk shortens shelf life.
- Salt after rinsing so you don’t wash the salt away.
- Save the buttermilk for pancakes, biscuits, or salad dressings.
- If you’re using a jar, shake vigorously but expect a longer time and more arm work.
- For flavored butter, add herbs, honey, garlic, or citrus zest after rinsing and before shaping.
Delicious Variations
- Garlic-Herb Butter: Mix in minced garlic, chopped parsley, and a pinch of salt.
- Honey Butter: Stir in honey and a little sea salt for sweet spread.
- Lemon-Dill Butter: Add lemon zest and chopped dill for fish or vegetables.
- Spiced Butter: Mix in smoked paprika or chili flakes for a smoky kick.
- Compound Butters: Roll butter with herbs in parchment into a log and slice as needed.
Frequently Asked Questions
Q: How much cream do I need to make one cup of butter?
A: Roughly 2 cups of heavy cream yield about 1 cup (8 ounces) of butter. Yield varies slightly by cream fat content.
Q: Can I make butter by shaking a jar?
A: Yes. Pour cream into a clean jar, seal, and shake. It will take longer and require more effort than a mixer, but it works and is fun for kids.
Q: What temperature should the cream be?
A: Cold cream works well and helps the butter firm up. Room temperature cream whips faster. If using a jar, start with chilled cream.
Q: Is homemade butter salted or unsalted?
A: It is unsalted by default. Add salt after rinsing to taste. Salted butter stores slightly longer.
Q: What do I do with the leftover buttermilk?
A: Save it for baking (pancakes, biscuits, muffins), salad dressings, or marinating chicken. Freeze if you won’t use it soon.
Q: How long will homemade butter last?
A: Refrigerated, it lasts about 2 weeks. Frozen, up to 3 months. Always check for off smells or flavors before using.
Q: Why does my butter taste sour?
A: Sourness can come from cultured cream or spoilage. If you used fresh heavy cream and rinsed well, a mild tang is normal; strong sourness may indicate the cream was past its prime.
Conclusion
Homemade butter is quick, rewarding, and tastes wonderful — fresh, creamy, and buttery with a texture you control. Once you try making it, you’ll enjoy the small rituals of rinsing, shaping, and using your butter in everyday meals. For an extra reference and method variation, see this classic Homemade Butter Recipe to compare techniques and ideas. Give it a try and enjoy the difference fresh butter makes.
Print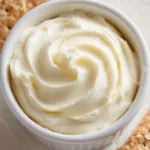
Homemade Butter
- Total Time: 15 minutes
- Yield: 8 servings 1x
- Diet: Vegetarian
Description
Learn how to make fresh, creamy homemade butter in just a few minutes using heavy cream.
Ingredients
- 2 cups heavy cream
- Salt (optional)
Instructions
- Pour the heavy cream into a mixing bowl. Use chilled heavy cream for best separation. If you prefer salted butter, measure a pinch of salt now to add later. Have a fine-mesh strainer or jar ready to catch the buttermilk.
- Using a hand mixer or stand mixer, whip the cream on medium speed until it thickens and forms whipped cream peaks. This takes a few minutes. Keep the mixer steady and watch the texture change from smooth to airy.
- Continue mixing until the cream separates into butter and buttermilk, about 8–10 minutes total from the start of whipping. You’ll hear a change in sound and see clumps of yellow butter form and a thin, translucent liquid (buttermilk) appear. Stop the mixer once you see solid butter and clear liquid.
- Once the butter forms, pour off the buttermilk into a container—you can save it for baking or pancakes. Rinse the butter under cold running water or knead it in cold water to remove any remaining buttermilk; repeat until the water runs clear. If desired, add salt to taste and mix well. Shape the butter into a log or press into a container. Store in the refrigerator.
Notes
Use high-fat heavy cream for the best yield and texture. Save the buttermilk for pancakes or biscuits, and enjoy variations like garlic-herb or honey butter.
- Prep Time: 5 minutes
- Cook Time: 10 minutes
- Category: Condiment
- Method: Churning
- Cuisine: American
Nutrition
- Serving Size: 1 tablespoon
- Calories: 102
- Sugar: 0g
- Sodium: 1mg
- Fat: 11.5g
- Saturated Fat: 7g
- Unsaturated Fat: 4.5g
- Trans Fat: 0g
- Carbohydrates: 0g
- Fiber: 0g
- Protein: 0.1g
- Cholesterol: 31mg