
The No-Bake Cherry Cheesecake is the perfect dessert for anyone who loves a sweet, creamy treat without the hassle of baking. With a smooth cream cheese filling perched atop a buttery graham cracker crust and dressed with luscious cherry pie filling, this cheesecake is a crowd-pleaser at any gathering. The best part? It requires no oven time, making it a fantastic option for warmer months or when you’re short on time.
Recipe Information
- Prep Time: 20 minutes
- Cook Time: 0 minutes
- Total Time: 4 hours 20 minutes (including chilling)
- Servings: 8
- Difficulty Level: Easy
Nutrition Information
- Calories per serving: 280
- Protein: 3g
- Carbohydrates: 36g
- Fat: 14g
- Fiber: 1g
- Sugar: 20g
- Sodium: 200mg
Why Make This No-Bake Cherry Cheesecake
This No-Bake Cherry Cheesecake offers a delightful balance of flavors and textures. The buttery graham cracker crust provides a crunchy foundation that pairs beautifully with the rich and creamy filling. Topped with bright, sweet cherry pie filling, this cheesecake delivers a burst of flavor that makes every bite satisfying. It’s a go-to dessert for potlucks, holidays, or simply to satisfy your sweet tooth — without the heat of the kitchen!
How to Make No-Bake Cherry Cheesecake
Ingredients:
- 1 ½ cups crushed graham crackers
- ½ cup unsalted butter, melted
- 1 cup powdered sugar
- 8 oz cream cheese, softened
- 1 tsp vanilla extract
- 2 cups whipped topping
- 1 can (21 oz) cherry pie filling
Directions:
Step 1: Preparation
In a mixing bowl, combine the crushed graham crackers and melted butter. Stir until the mixture resembles wet sand. Press the mixture firmly into the bottom of a 9-inch springform pan to form the crust.
Step 2: Mixing
In another bowl, beat the softened cream cheese until smooth and creamy. Gradually add the powdered sugar and vanilla extract. Mix until all ingredients are well combined and you have a smooth, fluffy mixture.
Step 3: Incorporating Whipped Topping
Gently fold in the whipped topping into the cream cheese mixture until it is light and fluffy. Be careful not to deflate the whipped topping too much, as this will help keep the cheesecake airy.
Step 4: Finishing
Pour the cream cheese mixture over the crust in the springform pan. Spread it out evenly using a spatula. Top with cherry pie filling, spreading it evenly over the cheesecake. Refrigerate for at least 4 hours, or until set. Once ready, remove the cheesecake from the springform pan and slice to serve.
How to Serve No-Bake Cherry Cheesecake
Serve this delightful cheesecake as a refreshing dessert on a warm day. For added flair, garnish with fresh cherries or a dollop of whipped cream. It pairs wonderfully with a scoop of vanilla ice cream or with a cup of coffee for a balanced dessert experience.
How to Store No-Bake Cherry Cheesecake
Store any leftovers in the refrigerator. Cover the cheesecake with plastic wrap or aluminum foil (or keep it in an airtight container) to keep it fresh. It will stay good for about 3 to 4 days in the fridge. For longer storage, consider freezing the cheesecake, although the texture may change slightly.
Expert Tips for Perfect No-Bake Cherry Cheesecake
- Ensure your cream cheese is at room temperature for a smoother mixture.
- Press the crust firmly to prevent it from crumbling when you slice into the cheesecake.
- For variations, try using different fruit toppings such as blueberries or strawberries for a different flavor profile.
- If you want to add a twist, a splash of almond extract can bring a lovely depth of flavor to the cream cheese mixture.
Delicious Variations
- Chocolate Cherry Cheesecake: Add melted chocolate to the cream cheese mixture for a rich chocolate flavor.
- Low-Carb Option: Substitute crushed nuts or almond flour for the graham cracker crust and use a sugar substitute.
- Mini Cheesecakes: Divide the crust and filling into muffin tins for individual mini cheesecakes.
Frequently Asked Questions
1. Can I use a store-bought crust?
Absolutely! A store-bought graham cracker crust works well and can save you some time.
2. How long does the cheesecake need to chill?
It’s best to chill the cheesecake for at least 4 hours, or overnight if you can wait, to ensure it sets properly.
3. Can I make this cheesecake ahead of time?
Yes! This cheesecake keeps well in the fridge, making it ideal for preparing ahead of a celebration.
4. Can I use fresh cherries instead of pie filling?
Yes! Fresh cherries can be used. Simply pit and slice them, then toss with a bit of sugar and let them sit to release their juices before topping the cheesecake.
5. What can I substitute for whipped topping?
Heavy cream can be whipped until stiff peaks form as a great alternative to store-bought whipped topping.
Conclusion
The No-Bake Cherry Cheesecake is a delightful treat that is simple to prepare and sure to impress. Its creamy texture, sweet cherry topping, and buttery crust create a perfect harmony of flavors. Whether you’re hosting a dinner party, celebrating a special occasion, or just treating yourself, this cheesecake is an easy and delicious choice. Enjoy making it, and remember, a slice of happiness is just a recipe away!
Print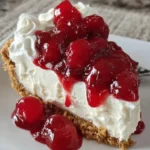
No-Bake Cherry Cheesecake
- Total Time: 260 minutes
- Yield: 8 servings 1x
- Diet: Vegetarian
Description
A creamy and delicious no-bake cheesecake topped with sweet cherry pie filling, perfect for any gathering.
Ingredients
- 1 ½ cups crushed graham crackers
- ½ cup unsalted butter, melted
- 1 cup powdered sugar
- 8 oz cream cheese, softened
- 1 tsp vanilla extract
- 2 cups whipped topping
- 1 can (21 oz) cherry pie filling
Instructions
- In a mixing bowl, combine the crushed graham crackers and melted butter. Stir until the mixture resembles wet sand. Press the mixture firmly into the bottom of a 9-inch springform pan to form the crust.
- In another bowl, beat the softened cream cheese until smooth and creamy. Gradually add the powdered sugar and vanilla extract. Mix until combined.
- Gently fold in the whipped topping until light and fluffy, being careful not to deflate it too much.
- Pour the cream cheese mixture over the crust in the springform pan. Top with cherry pie filling. Refrigerate for at least 4 hours until set, then slice to serve.
Notes
For variations, try different fruit toppings or add a splash of almond extract for extra flavor.
- Prep Time: 20 minutes
- Cook Time: 0 minutes
- Category: Dessert
- Method: Chilling
- Cuisine: American
Nutrition
- Serving Size: 1 slice
- Calories: 280
- Sugar: 20g
- Sodium: 200mg
- Fat: 14g
- Saturated Fat: 8g
- Unsaturated Fat: 6g
- Trans Fat: 0g
- Carbohydrates: 36g
- Fiber: 1g
- Protein: 3g
- Cholesterol: 30mg